

<Previous Lesson> <<Home>> <<Next Lesson>>
36.1 Compiling your Visual Basic Program
Once your have
completed a VB program, you can compile the program to run as a
standalone windows application, without having to launch the
Visual Basic IDE. However, before you compile your program, you have to
debug your program to make sure it is errors free. Once the program is
compiled into an EXE file (executable file), you can not debug it
anymore. If you wish to do so, you have to correct the errors and
recompile it.>
To start compiling your program,
click on the menu File and select Make Project1.exe, as show in Figure
36.1. When you click on Make Project1.exe , the Make Project dialog
box
will appear, as shown in Figure 36.2. In this dialog box, assign a
file name to this project and save it in the folder chosen by you. After
clicking the OK button, the project properties dialog will appear where
you can select
the project you wish to compile, as shown in Fgure 36.3. In this
example, the project we chose to
compile is reversi. The option button in this dialog box let you
customize the program you are going to compile. For example, you can
enter the title of the program , the program's version and your
company
name. Clicking on the compile tab will let you decide the kind
of code you wish to compile, as shown in Figure 36.4. The default
option is native code and it is
the best option because it normally runs faster. It requires fewer
files to run, particular the VB DLL files. Once you have done that,
you
can click the OK button to compile the program. Now you program can
run
as a standalone application. You can start your program without
launching the Visual Basic IDE.

Figure 36.1

Figure 36.2
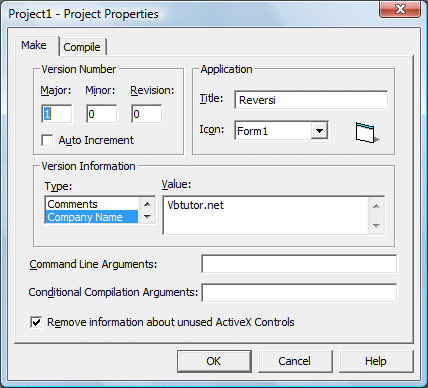
Figure 36.3

Figure 36.4
36.2 Distributing Your Programs
After successfully created a VB
program, you might want to market your product, either online or
offline. This means that you need to create a package that can
be distributed to your potential customers. The package created
can be distributed using CD ROM, DVDROM or the Internet. The
package will allow the user to install the program to install in
the computer with the standard setup routine.
To create the distributable
package, you can use the Package and Development Wizard that
came with Visual Basic 6. The main purpose of this wizard is to
create a setup program that can be used to install the
application. Off course, it also does many other jobs like
compiling your application and compresses the files for easy
distribution.
When you start the Package and
Development Wizard, you will be presented with the following
dialog box:

First of all, you need to select
the project you want to package. Here we have selected the starwar.vbp project. Next, you need to select one of the three
options. Here, I suggest you select the first option to let the
wizard create the installation package for you to
distribute it using CD ROM or the Internet.
Once you click the package option,
you will see the following dialog box where you are asked to
choose a packaging script:


After clicking the next button, you will see the following
dialog box where you will be asked to choose a packaging type. Normally we
choose the Standard Setup Package.
The next dialog box that shows up will ask you where to store the package, as shown below:

The next dialog box will show you the files that will be included in the package.
When you click the Finish button, the package
will be created and ready for distribution. Here is the packaged files
for the starwar program for download at
Setup.exe
SETUP.LST
starwar5.CAB
You must download all the three files into a folder and then run the setup program.
0 comments :
Post a Comment